




A Visual Guide to Knife Grinds: Why Blade Geometry Matters
August 31st, 2026
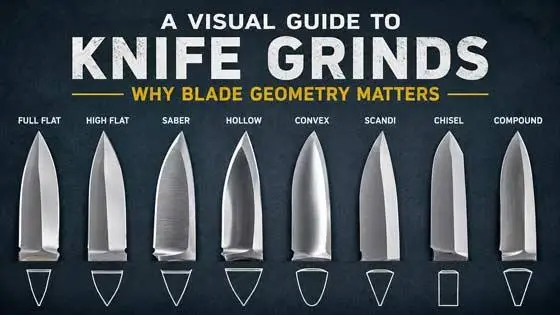
A knife can have the perfect blade shape and still cut completely differently from another knife that looks almost identical. The reason is often hidden in the geometry between the spine and the cutting edge. Known as the blade grind, this cross-sectional shape determines how quickly a blade becomes thinner toward its edge, how much material remains behind that edge, and how the blade moves through whatever it is cutting. Full flat grinds, hollow grinds, saber grinds, convex grinds, Scandi grinds, and other designs each approach that geometry differently, creating tradeoffs that are almost impossible to understand from a side-view photograph alone. In this visual guide, we'll look at knife blades from a different angle, breaking down the major grind types and showing why the geometry you barely notice can have such a significant effect on how a knife behaves.
What Exactly Is a Knife Grind?
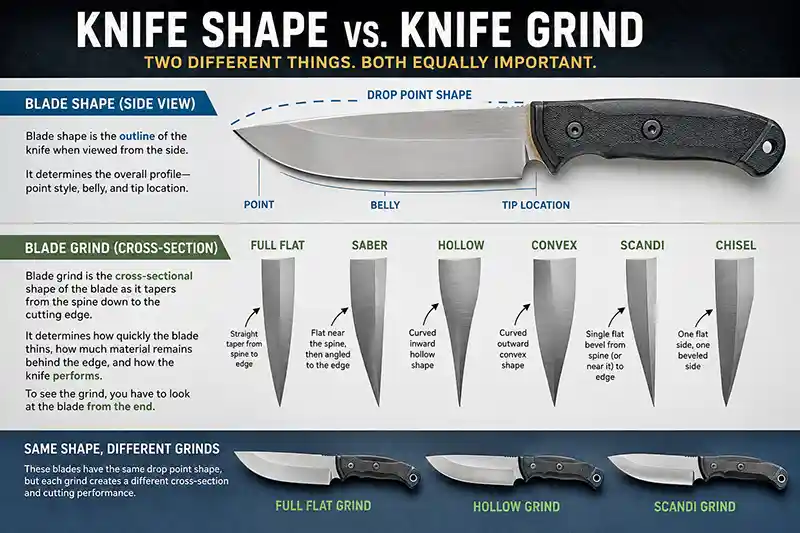
A knife grind is the way the sides of a blade are shaped as they transition from their full thickness toward the cutting edge. If you could cut straight through a blade and look at its cross-section from the end, the grind would become much easier to see. Some blades taper toward the edge in straight, continuous lines. Others curve inward, bow outward, or remain thick for part of their height before beginning to narrow. Those seemingly small differences create the major grind types we know as full flat, saber, hollow, convex, Scandi, chisel, and several other variations.
This is different from blade shape, which describes the outline of the knife when viewed from the side. A drop point and a clip point can have completely different profiles while using the same type of grind. Likewise, two nearly identical drop-point blades could use completely different grinds and have very different cross-sectional geometry. If you want to see how those side profiles differ, our visual guide to knife blade shapes breaks down the major blade profiles and the features that define them.
The easiest way to understand the distinction is to imagine looking at a knife from two directions. Look at it from the side and you can see the blade shape. Look directly at a cross-section of the blade and you begin to see the grind. That second view reveals how quickly the blade becomes thinner as it approaches the cutting edge and how much material remains behind that edge.
This is why grind geometry can matter even when two knives look almost identical in photographs. The silhouette may tell you where the point sits and how the cutting edge curves, but it cannot show everything happening across the thickness of the blade. To understand that, you have to look at the knife from an entirely different angle.
Why Does Blade Grind Matter So Much?
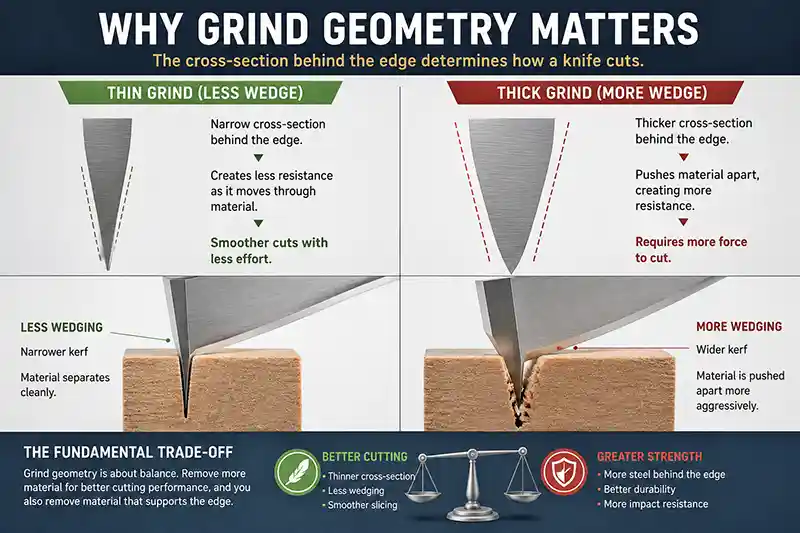
A knife does not stop interacting with material once the cutting edge begins the cut. The rest of the blade has to follow behind it, which means the geometry above the edge can have an enormous influence on how easily the blade continues moving through material. A knife can be extremely sharp at the very edge yet still require noticeably more force as the thicker portion of the blade enters the cut.
This is where blade grind becomes important. A grind that produces a thin cross-section behind the cutting edge generally creates less of a wedge as the blade passes through material. A thicker geometry pushes material apart more aggressively. Neither approach is automatically better because removing material to create thinner geometry also changes how much steel remains behind the edge.
That creates one of the fundamental tradeoffs in knife design. Thinner, more acute geometry can reduce cutting resistance, while thicker geometry generally provides more material to support the edge. Knife designers therefore have to balance cutting ability against the durability required for the knife's intended use. The geometry that makes sense for a thin slicing knife may be very different from the geometry chosen for a heavier fixed blade expected to encounter greater stresses.
This also explains why judging a knife solely by how sharp it feels can be misleading. Sharpness describes what is happening at the extremely small apex of the cutting edge, while the grind determines much of the geometry immediately behind it. Once a cut moves beyond that initial edge, the shape of the rest of the blade begins to matter.
As we move through the individual grind types, this tradeoff will appear again and again. Full flat, hollow, saber, convex, and Scandi grinds are not simply different ways to make a blade look interesting. Each represents a different approach to deciding where the blade should become thinner, how rapidly that transition should occur, and how much material should remain behind the cutting edge.
Full Flat Grind: When the Entire Blade Tapers Toward the Edge
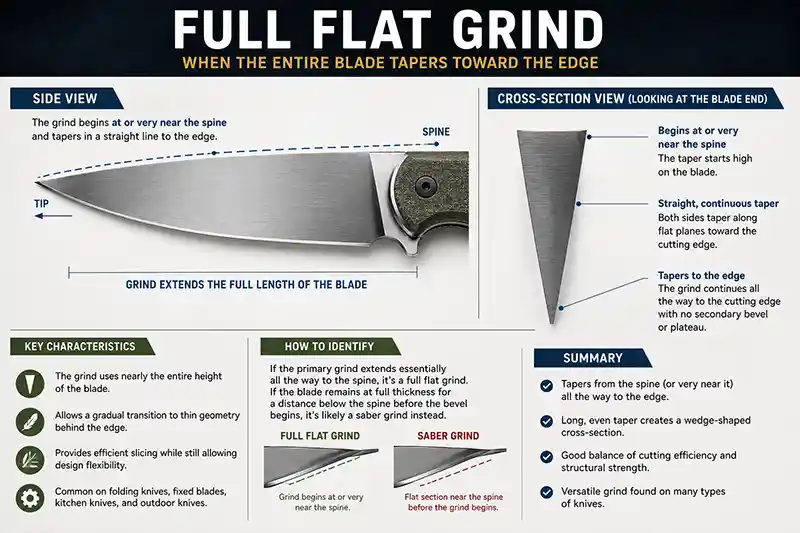
The full flat grind is one of the easiest blade grinds to understand visually. Beginning at or very near the spine, both sides of the blade taper inward along relatively straight planes until they approach the cutting edge. Viewed in cross-section, the blade resembles a long, narrow wedge rather than remaining at full thickness for part of its height before the grind begins.
Because the taper uses nearly the entire height of the blade, a full flat grind can transition gradually from the spine toward the edge. This allows designers to create relatively thin geometry behind the cutting edge without requiring an extremely abrupt change in thickness. The exact result still depends heavily on blade stock thickness, blade height, edge thickness, and the angle of the grind. Two full-flat-ground knives can therefore have noticeably different cross-sections even though both belong to the same grind family.
That gradual taper helps explain why full flat grinds appear on such a wide variety of knives. They can provide efficient slicing geometry while still leaving designers considerable freedom to adjust the thickness and proportions of the blade. Full flat grinds can be found on everything from folding knives and general-purpose fixed blades to kitchen and outdoor knives, although the grind alone does not determine how well any particular knife will perform.
One detail is especially important when identifying a full flat grind: the primary grind extends essentially all the way to the spine. If the blade remains at its full thickness for a noticeable distance below the spine before the flat bevel begins, you are probably looking at a saber grind instead. That seemingly small difference in where the taper starts creates one of the most important distinctions between the two grind types.
Saber Grind: Leaving More Material Near the Spine
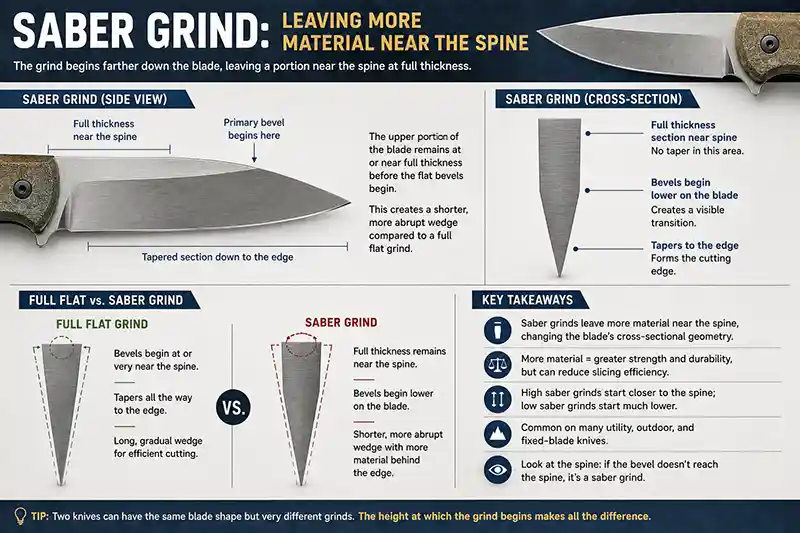
A saber grind uses flat bevels much like a full flat grind, but with one important difference: the taper begins farther down the blade. The upper portion remains at or near its full thickness before the primary bevels begin, creating a visible transition between the flat section near the spine and the angled surfaces leading toward the cutting edge. Viewed in cross-section, the result is a shorter, more abrupt wedge than the long taper of a full flat grind.
Leaving that additional material near the spine changes the geometry of the blade. If two blades begin with similar stock thickness and width, a saber grind can retain more thickness through the upper portion of the blade than a comparable full flat grind. Depending on how low the grind begins and how thick the blade remains behind the edge, this can produce a more substantial cross-section at the expense of some slicing efficiency.
Not every saber grind is especially thick. A high saber grind may begin relatively close to the spine and can look surprisingly similar to a full flat grind, while a low saber grind leaves a much larger section of the blade at full thickness. This means "saber grind" describes where the flat primary bevel begins rather than specifying one exact angle or degree of thickness.
The geometry has made saber grinds common on many utility, outdoor, and fixed-blade knives where designers want to retain substantial material through part of the blade while still creating flat bevels toward the edge. If you look through different styles of fixed blade knives, the relationship between blade thickness, grind height, and intended design becomes much easier to notice once you know what to look for.
The quickest way to distinguish a saber grind from a full flat grind is therefore to ignore the cutting edge and look toward the spine. If the primary bevel reaches essentially all the way up the blade, it is likely a full flat grind. If a clearly visible section remains at full thickness above the bevel, you are looking at some form of saber grind.
Hollow Grind: When the Blade Curves Inward Toward the Edge
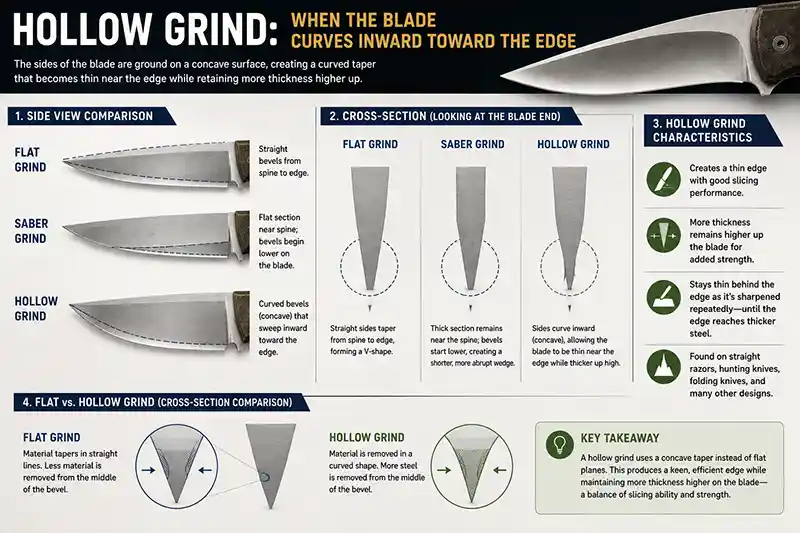
A hollow grind is immediately different from the flat grinds we have covered so far because the sides of the blade do not taper toward the edge along straight planes. Instead, the ground surfaces curve inward, creating a concave cross-section. Imagine removing material from each side of a blade with the surface of a large grinding wheel and the basic geometry becomes much easier to visualize.
That concave shape allows the blade to become relatively thin behind the cutting edge while retaining more thickness farther up the blade. How dramatic the hollow becomes depends partly on the radius used to create it. A shallow hollow grind can be difficult to recognize at a glance, while a more pronounced hollow produces an obvious inward curve along the primary bevel.
One of the interesting characteristics of hollow geometry is what happens as the edge is sharpened repeatedly. Because the blade behind the edge can remain relatively thin for some distance above the original cutting edge, a hollow-ground knife may continue to expose comparatively thin geometry as material is removed during sharpening. Eventually, however, enough steel can be removed that the edge reaches progressively thicker portions of the blade.
Hollow grinds have appeared on everything from straight razors to hunting knives and modern folding knives. The geometry can be particularly effective when a designer wants a keen cutting edge without thinning the entire height of the blade in the same way as a full flat grind. As always, the grind name alone does not tell us exactly how thin or durable the finished blade will be. Blade stock, grind depth, edge thickness, steel, and heat treatment still matter enormously.
The easiest way to identify a hollow grind is to look for that inward-curving primary bevel. A full flat or saber grind creates essentially straight surfaces as the blade narrows toward the edge. A hollow grind removes additional material from the middle of that transition, producing the distinctive concave geometry that gives the grind its name.
Convex Grind: When the Blade Curves Outward Toward the Edge
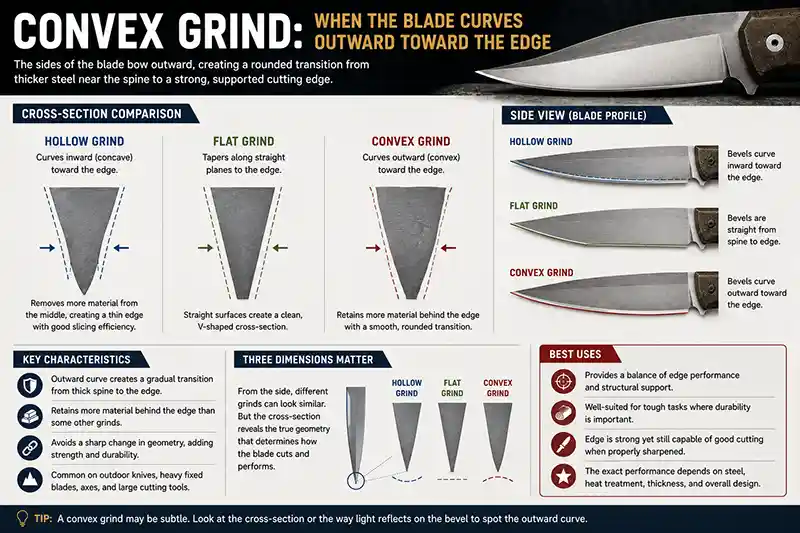
If a hollow grind curves inward as it approaches the cutting edge, a convex grind does the opposite. The sides of the blade bow gently outward, creating a rounded transition from the thicker portion of the blade toward the edge. Viewed in cross-section, there are no perfectly flat primary bevels and no concave hollow. Instead, the surface follows a continuous outward curve.
That curve allows a convex grind to retain more material behind the cutting edge than some thinner geometries while avoiding an abrupt shoulder where one flat surface meets another. Rather than transitioning from the main blade into a clearly defined bevel, the thickness can decrease progressively along a smooth curve. Exactly how much material remains depends on how pronounced the convexity is and on the overall thickness and dimensions of the blade.
Convex geometry has long been associated with knives and larger cutting tools expected to combine a functional edge with substantial support behind it. Variations can be found on outdoor knives, heavy fixed blades, axes, and other edged tools. This does not mean every convex-ground blade is automatically stronger than every flat- or hollow-ground blade. Steel, heat treatment, edge angle, stock thickness, and the exact geometry still determine how the finished tool behaves.
Convex grinds can also be surprisingly difficult to identify from photographs. On some blades, the outward curve is subtle enough that the grind may initially appear flat. Reflections across the blade surface can provide clues, but examining the cross-section makes the difference much clearer. A flat grind narrows along straight planes, a hollow grind curves inward, and a convex grind bows outward.
This makes convex geometry a perfect example of why understanding knife grinds requires thinking in three dimensions. From the side, a convex-ground knife may look almost identical to one with a completely different grind. Turn the blade toward its edge and the hidden geometry tells an entirely different story.
Scandi Grind: A Simple Bevel With a Long Tradition
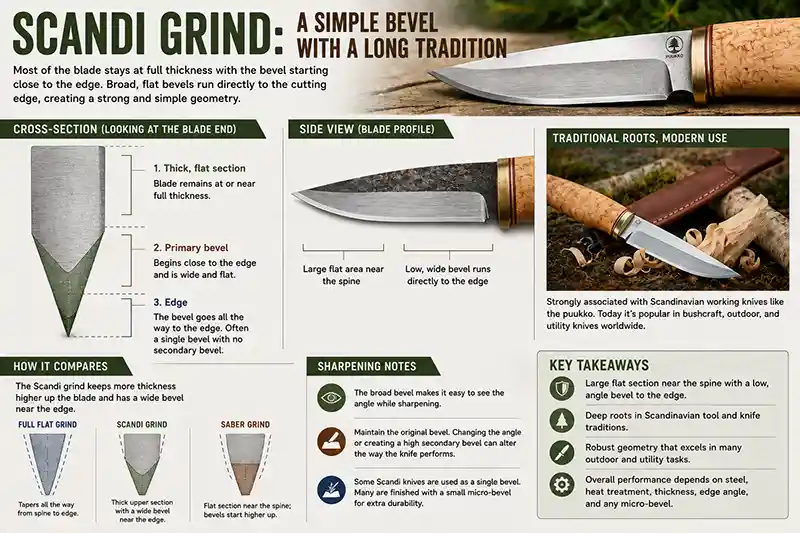
The Scandinavian grind, usually shortened to Scandi grind, is easy to recognize once you know where to look. Most of the blade remains at or near its full thickness, with the primary bevel beginning relatively close to the cutting edge. From there, broad flat bevels angle directly toward the edge, producing a cross-section that looks very different from the long taper of a full flat grind.
One of the defining characteristics of a traditional Scandi grind is that the primary bevel can form the cutting edge itself rather than transitioning into a clearly separate secondary bevel. This creates a wide, visible bevel near the bottom of the blade. In practice, however, terminology is not perfectly consistent, and some Scandi-ground knives are manufactured or later sharpened with a small secondary or micro-bevel at the very edge.
The geometry has a particularly strong association with traditional Scandinavian working knives, including Finnish puukko and other Nordic knife traditions. These knives developed as practical tools used for everyday tasks in regions where woodworking and outdoor use were part of ordinary life. Modern outdoor and bushcraft knives have helped make the Scandi grind familiar far beyond Scandinavia.
Because so much of the blade remains relatively thick before the bevel begins, a Scandi grind creates a very different cross-section from a full flat grind even when the two knives have similar blade shapes. Its broad bevel can also provide a large, easy-to-see surface during sharpening, although maintaining the original geometry requires following that bevel rather than gradually changing its angle over repeated sharpenings.
Scandi grinds are often discussed as though every example behaves identically, but the same caution applies here as with every other grind. Blade thickness, bevel height, steel, heat treatment, edge angle, and the presence of a micro-bevel can all change the finished knife. "Scandi" tells us the basic geometry, not everything about how the blade will perform.
Chisel Grind: When Only One Side of the Blade Is Ground
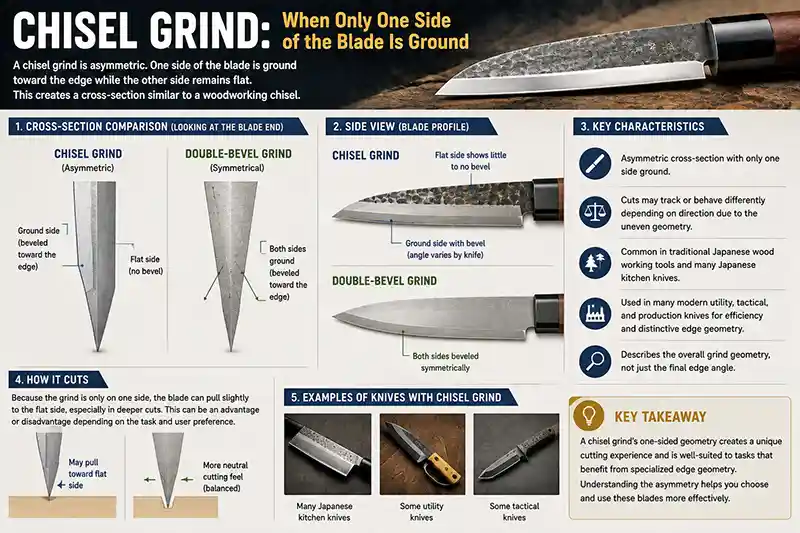
Most of the grinds we have examined so far remove material from both sides of the blade. A chisel grind takes a fundamentally different approach. One side is ground toward the cutting edge while the opposite side remains largely flat, creating an asymmetrical cross-section that resembles the geometry of a woodworking chisel. That one-sided construction makes it one of the easiest major grind types to recognize when viewed from the end of the blade.
The ground side can use different geometry depending on the knife. It may have a flat bevel, a hollow-ground surface, or another variation, while the opposite face remains comparatively flat. This means "chisel grind" primarily tells us that the blade is ground asymmetrically rather than specifying the exact shape of the bevel itself.
One consequence of that asymmetry is that the blade can behave differently depending on the direction of the cut. Because material is removed differently from each side, the forces acting on the blade are not balanced in exactly the same way as they are on a symmetrical double-bevel grind. This can influence how the blade tracks through material, particularly during deeper or highly controlled cuts.
Chisel-ground edges have a long history on specialized cutting tools, particularly traditional Japanese woodworking tools and some Japanese kitchen knives, although those tools include their own variations in geometry and should not all be treated as identical. The same general concept later appeared on various modern utility, tactical, and production knives because a one-sided grind can create distinctive edge geometry while simplifying certain aspects of manufacture.
It is also important not to confuse a chisel grind with a single-bevel sharpening job applied to an otherwise conventional blade. When describing the grind itself, we are talking about the larger cross-sectional geometry of the blade, not simply the microscopic angle at the final cutting edge. As with every grind in this guide, looking beyond the edge and examining how the entire blade transitions through its thickness reveals what is really happening.
High Flat Grind: The Middle Ground Between Full Flat and Saber
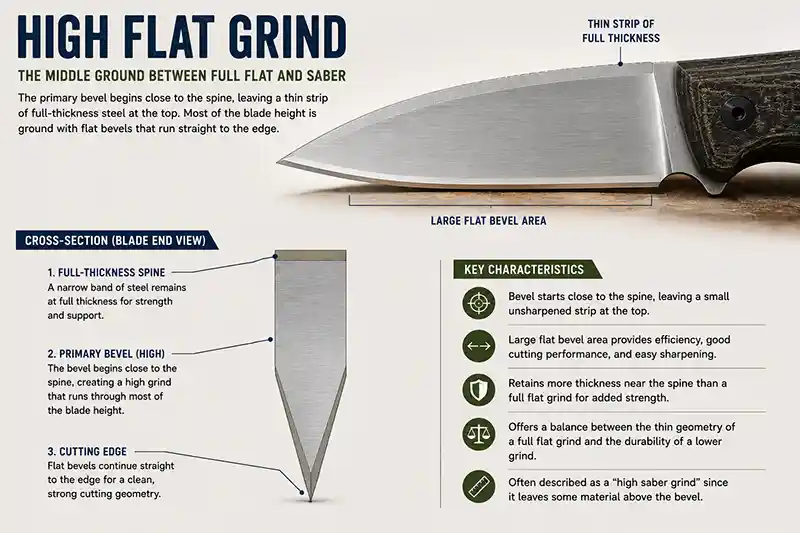
A high flat grind begins its primary bevel close to the spine without extending completely to it. The uppermost portion of the blade remains at or near full thickness, while the majority of the blade height is occupied by straight, flat bevels leading toward the cutting edge. Visually, this can make a high flat grind look almost identical to a full flat grind until you notice the narrow strip of unground blade running beneath the spine.
Technically, a high flat grind can be considered a high saber grind because the blade retains some full-thickness material above the primary bevel. In everyday knife terminology, however, "high flat grind" is often used to emphasize that the flat bevel rises through most of the blade. This is another example of why grind terminology should be treated as a useful descriptive vocabulary rather than a perfectly standardized classification system.
Moving the grind higher changes the angle required for the bevel to reach the cutting edge. If two blades have the same height, stock thickness, and edge thickness, a bevel that begins higher can taper more gradually than one beginning much lower. That can create thinner geometry through more of the blade while still preserving a small section of full-thickness steel near the spine.
This is one reason grind height deserves attention when comparing knives. Simply describing two blades as "flat ground" does not reveal where their primary bevels begin, and that difference can noticeably alter their cross-sections. A low saber grind, high flat grind, and full flat grind can all use straight bevels while distributing material very differently across the blade.
The distinction also demonstrates how blade grinds exist along a spectrum rather than always falling into perfectly separate categories. Raise a saber grind progressively higher and it begins to resemble a full flat grind. Continue until the bevel reaches the spine and the distinction effectively disappears. Sometimes a few millimeters of steel are all that separate one grind label from another.
Zero Grind: When the Primary Grind Goes All the Way to the Edge
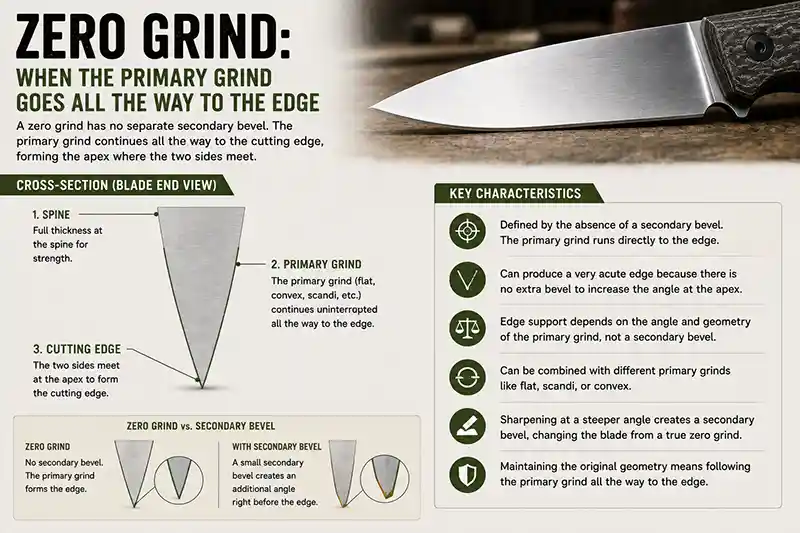
A zero grind is defined by what is missing at the very bottom of the blade: a separate secondary edge bevel. Instead, the primary grind continues all the way down until the two surfaces meet to form the cutting edge. In cross-section, there is no obvious change in angle immediately before the apex. The larger geometry of the blade simply continues until it reaches zero thickness at the edge.
This is an important distinction because grind type and edge construction are sometimes discussed as though they are the same thing. A blade can have broad flat surfaces, convex geometry, or another primary grind while still differing in how the final cutting edge is formed. Adding a secondary bevel introduces another angle near the apex, while a true zero grind carries the primary geometry directly to the edge.
Zero-ground geometry can create an extremely acute transition toward the cutting edge because there is no thicker secondary bevel interrupting the primary grind. The tradeoff is that the amount of material supporting the very edge depends directly on the angle and geometry of that primary grind. A particularly thin zero-ground blade can therefore behave very differently from a thicker blade even though both technically use a zero grind.
The concept also overlaps with some of the grinds we have already discussed. Traditional Scandi geometry, for example, may carry its broad primary bevel directly to the edge and can therefore also be described as zero ground. Convex blades can likewise be brought continuously to the apex without a distinct secondary bevel. "Zero grind" is consequently better understood as a description of how the primary geometry terminates at the edge rather than one specific cross-sectional shape.
Repeated sharpening can change that geometry. If a zero-ground blade is sharpened only at a steeper angle near the edge, a secondary bevel gradually develops and the blade is no longer a true zero grind in the strictest sense. Maintaining the original geometry generally means working with the primary bevel or curve itself rather than treating only a narrow strip at the cutting edge.
Compound Grind: When One Blade Uses More Than One Grind
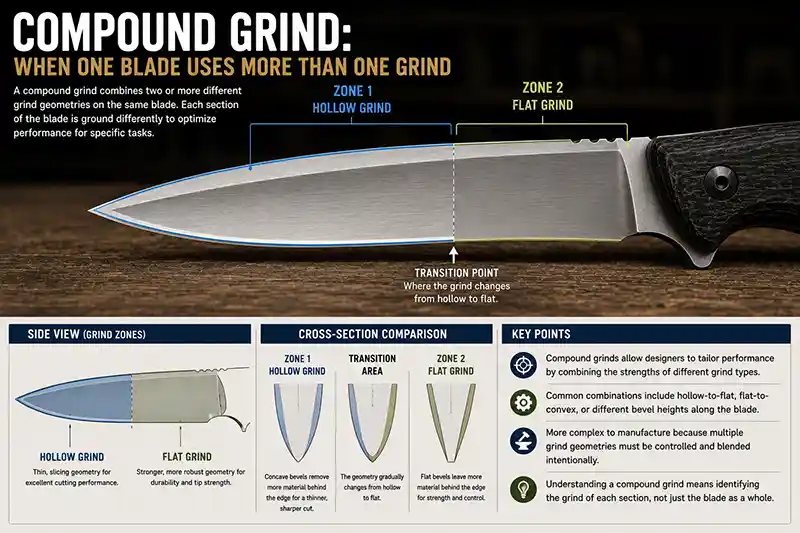
A compound grind combines two or more different grind geometries on the same blade. Instead of applying one continuous cross-section from heel to tip, the designer changes the geometry along different portions of the blade. The rear section might use one grind while the geometry near the tip changes to another, allowing different areas of the blade to emphasize different characteristics.
This makes compound grinds fundamentally different from most of the categories we have covered so far. A full flat, hollow, or convex grind describes a particular cross-sectional geometry. "Compound grind" describes the decision to use multiple geometries together. The individual sections still have to be identified separately to understand what the blade is actually doing.
For example, a designer might use thinner geometry along the primary cutting portion of a blade while leaving more material near the tip. Another design could combine hollow-ground and flat-ground sections, or transition between different bevel heights along the blade. There is no single formula that every compound grind follows, which is why two knives described with the same term can look dramatically different.
These designs can also be considerably more complex to manufacture. Instead of maintaining one consistent grind across the blade, the maker has to control where one geometry ends and another begins while keeping the transitions intentional and repeatable. Modern grinding equipment and precision manufacturing have made elaborate compound grinds increasingly practical, although custom knife makers have also used complex combinations of bevels for both functional and aesthetic reasons.
Compound grinds are a useful reminder that knife-grind terminology is not always a collection of mutually exclusive categories. A single blade can be hollow ground in one area, flat ground somewhere else, and still accurately be described as having a compound grind. Once designers begin combining geometries, asking "What grind does this knife have?" may require more than one answer.
Blade Grind vs. Edge Bevel: They Are Not the Same Thing
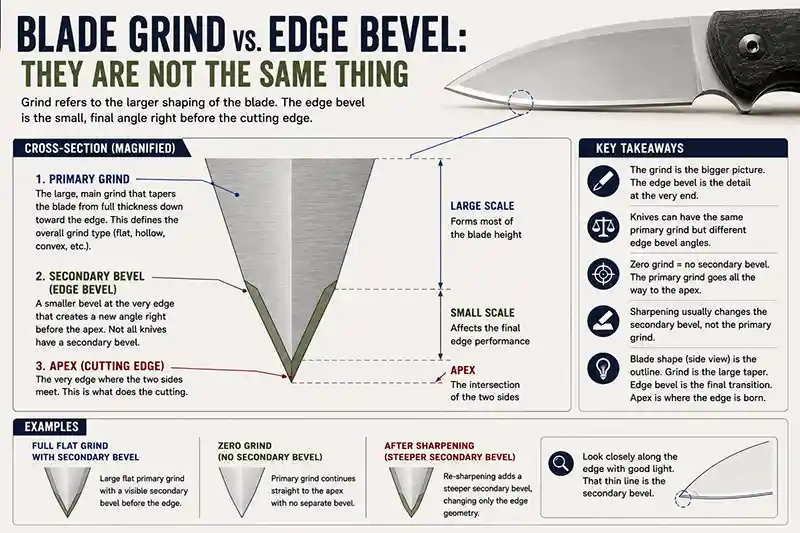
One of the easiest mistakes to make when discussing knife geometry is using "grind" and "edge bevel" as though they describe the same feature. They are closely related, but they exist at very different scales. The primary grind shapes a large portion of the blade as it transitions from its full thickness toward the cutting edge. The edge bevel is the much smaller area at the very bottom of that geometry where the final cutting edge is created.
On many knives, the distinction is visible if you look closely at the blade. A large flat, hollow, or saber grind may occupy most of the blade's height, while a narrow secondary bevel appears as a thin strip running directly along the cutting edge. That small bevel introduces a new angle immediately before the two sides meet at the apex.
This means two knives can use the same primary grind while having different edge geometry. Both could be full flat ground, for example, while one has a relatively acute secondary bevel and the other has a steeper one. They would still share the same basic grind classification even though the geometry at the final cutting edge differs.
The distinction becomes even clearer with a zero grind. On a true zero-ground blade, there is no separate secondary bevel. The primary grind continues all the way to the apex. Add a secondary bevel during sharpening and the larger primary grind may remain unchanged, but the geometry immediately behind the cutting edge is now different.
Understanding this distinction also explains why sharpening does not usually change a knife from one primary grind to another. Touching up the narrow edge bevel of a hollow-ground knife does not suddenly make the blade flat ground. Changing the primary grind would require removing material across a much larger portion of the blade itself.
Once these layers are separated mentally, knife geometry becomes much easier to understand. Blade shape describes the outline seen from the side. Primary grind describes the larger cross-sectional taper. Edge bevel describes the final transition toward the cutting edge. The apex is the tiny intersection where the two sides ultimately meet. All four can influence how a knife behaves, but they describe different parts of the design.
Why Two Equally Sharp Knives Can Cut Completely Differently
Sharpness is often treated as though it determines how well a knife cuts, but that is only part of the story. The cutting edge makes the initial separation in the material, yet the rest of the blade has to continue through the opening it creates. Once that happens, the thickness and geometry behind the edge begin influencing how much resistance the blade encounters.
Imagine two knives sharpened to similarly keen edges. One becomes thin very quickly behind that edge, while the other thickens much more abruptly. Both may feel equally sharp when lightly tested, but during a deeper cut the thicker blade has to push the surrounding material farther apart. That additional wedging can make the knife require more force even though there is nothing wrong with the sharpness of its edge.
This is why grind geometry becomes particularly noticeable when cutting thicker materials. During an extremely shallow cut, only the edge and the steel immediately behind it may enter the material. As the cut becomes deeper, progressively more of the blade's cross-section becomes involved. At that point, differences between thin and thick geometry can become much easier to feel.
None of this means that the thinnest possible blade is automatically the best design. Removing material behind the edge can improve cutting efficiency, but that material also contributes to the structure supporting the edge and the rest of the blade. A knife intended for delicate slicing can therefore justify geometry that would make little sense on a heavier working knife expected to tolerate very different stresses.
Steel selection further complicates the equation. Toughness, hardness, edge retention, and heat treatment can influence how thin a particular blade can reasonably be made for its intended purpose. Our guide to different types of knife steels looks more closely at those material differences and why the name of the steel is only one part of understanding a blade.
This is ultimately why grind matters so much. Sharpness tells us something about the edge at a particular moment. Grind geometry tells us how the blade is shaped behind that edge, and that hidden geometry continues influencing the cut long after the apex has done its initial work.
Is a Thinner Blade Grind Always Better?
If thinner geometry can reduce resistance during a cut, it might seem logical that every knife should simply be ground as thin as possible. Knife design is rarely that simple. Removing steel can improve cutting efficiency, but it also reduces the amount of material supporting the cutting edge. At some point, making a blade thinner stops being a free improvement and becomes a tradeoff.
The appropriate geometry depends heavily on what the knife is expected to do. A blade designed primarily for controlled slicing can take advantage of relatively thin geometry because minimizing resistance is a major part of its job. A heavier outdoor or utility knife may be designed around a different set of priorities, where additional material behind the edge is intentionally retained to provide greater support during more demanding use.
Steel and heat treatment influence how far a designer can push those choices. Different steels can tolerate different combinations of hardness, toughness, and edge geometry, and even the same steel can behave differently depending on how it has been heat treated. This is one reason simply comparing blade thickness or grind type does not reliably tell you which of two knives is better constructed.
The intended material matters too. Geometry optimized for moving through food, cardboard, wood, rope, or other materials does not necessarily need to be identical. Blade designers can alter stock thickness, grind height, primary grind, and edge bevel to create different balances between cutting resistance and the amount of material supporting the edge.
A better question is therefore not "Which grind is thinnest?" but "How much material should this blade retain for what it is expected to do?" The best grind is not the one that wins a theoretical contest for minimum thickness. It is the one whose geometry makes sense as part of the knife's complete design.
How Does Blade Grind Affect Sharpening?
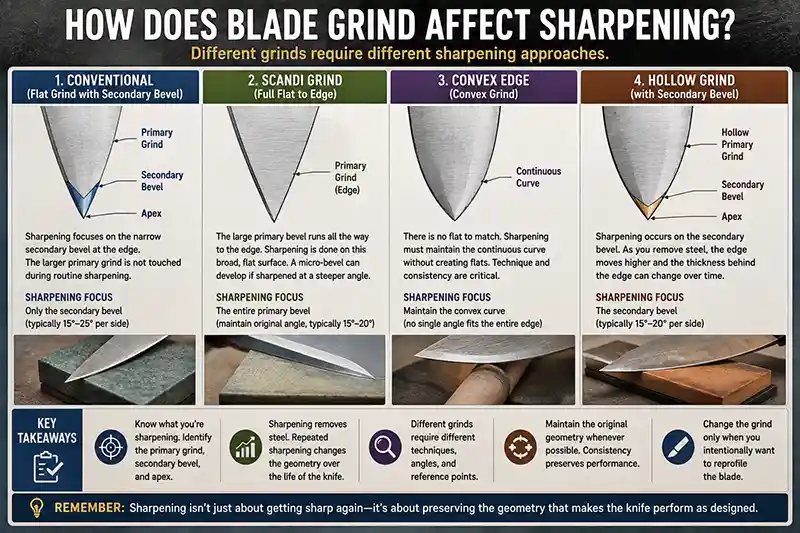
Sharpening a knife means removing enough material to restore the cutting edge, but the geometry surrounding that edge determines how straightforward that process can be. On many conventionally ground knives, routine sharpening concentrates primarily on the narrow secondary bevel at the edge. The larger primary grind remains essentially untouched unless the blade is being substantially thinned or reprofiled.
Scandi grinds approach the problem differently. When the broad primary bevel runs directly to the edge, that large flat surface can serve as a reference during sharpening. Maintaining the original geometry may involve working along much more of the bevel rather than concentrating only on a tiny secondary edge. If repeated sharpening is performed at a steeper angle instead, a secondary or micro-bevel can gradually develop.
Convex geometry presents another challenge because there may be no single flat surface corresponding to the curve of the grind or edge. Maintaining a true convex profile requires preserving that gradual outward transition rather than unintentionally turning it into a series of distinct flat bevels. This is one reason sharpening technique can influence the geometry of a knife over time rather than merely making a dull edge sharp again.
Hollow grinds create a different situation. The concave primary grind can leave relatively thin material behind the edge, but routine sharpening commonly occurs at a separate secondary bevel. As repeated sharpening removes steel and moves the edge farther up the blade, the thickness encountered behind the new edge can gradually change. Eventually, a knife that has been sharpened many times may no longer have the same behind-the-edge geometry it had when new.
Compound and asymmetrical grinds can require still more attention because different sections or sides of the blade may not share identical geometry. The important principle is that sharpening should begin with understanding what is actually being sharpened. The primary grind, secondary bevel, and apex are separate features, and changing one does not necessarily mean changing the others.
Over the life of a knife, sharpening is therefore part of its geometry rather than merely maintenance performed on top of it. Every sharpening removes steel. Done consistently, it preserves the intended edge geometry. Done differently, it can slowly transform that geometry into something the original blade never had.
Knife Grinds at a Glance: Quick Reference Guide
Knife-grind terminology can become confusing because some terms describe the shape of the primary grind, others describe where that grind begins, and still others describe how the geometry reaches the cutting edge. The table below provides a quick comparison of the major grinds covered in this guide. These are general characteristics rather than rigid specifications, and individual knives can vary considerably within each category.
| Grind Type | How to Recognize It | Cross-Section | Material Behind the Edge | Key Characteristic |
|---|---|---|---|---|
| Full Flat | Primary bevel begins at or very near the spine | Straight taper across nearly the entire blade height | Can be relatively thin depending on blade dimensions | Long, gradual taper from spine toward edge |
| High Flat | Flat bevel begins close to the spine but leaves a narrow full-thickness section | Long straight taper with a small flat section near the spine | Usually retains slightly more upper-blade thickness than a comparable full flat grind | Bridges the geometry between full flat and lower saber grinds |
| Saber | Blade remains at full thickness before flat bevels begin farther down | Shorter straight taper below a full-thickness upper section | Can retain substantial material depending on grind height | Grind height can vary from very low to nearly full flat |
| Hollow | Primary bevel visibly curves inward | Concave | Can become relatively thin behind the edge while remaining thicker higher on the blade | Material is removed from the middle of the bevel by an inward curve |
| Convex | Primary geometry bows outward toward the edge | Convex | Can retain substantial support behind the edge | Smooth outward curve rather than flat or concave bevels |
| Scandi | Most of the blade remains thick before a low, broad bevel begins | Wide flat bevel near the cutting edge | Substantial material remains through most of the blade height | Primary bevel commonly runs directly to the edge |
| Chisel | One side is ground while the opposite side remains comparatively flat | Asymmetrical | Depends heavily on bevel angle and blade thickness | Unlike most knife grinds, the two sides do not mirror one another |
| Zero | No distinct secondary bevel at the cutting edge | Depends on the underlying primary grind | Depends entirely on primary geometry | The primary grind continues directly to the apex |
| Compound | Different portions of the blade use different grind geometries | Changes along the length of the blade | Varies by section | Allows multiple grind characteristics to exist on one blade |
The quickest way to identify an unfamiliar grind is to stop looking at the blade as a flat silhouette and imagine its cross-section. Ask where the taper begins, whether its surfaces are straight or curved, whether both sides are symmetrical, and whether the primary geometry continues directly to the edge. Those few observations can identify most common knife grinds without relying on the manufacturer's terminology.
How to Identify an Unknown Knife Grind
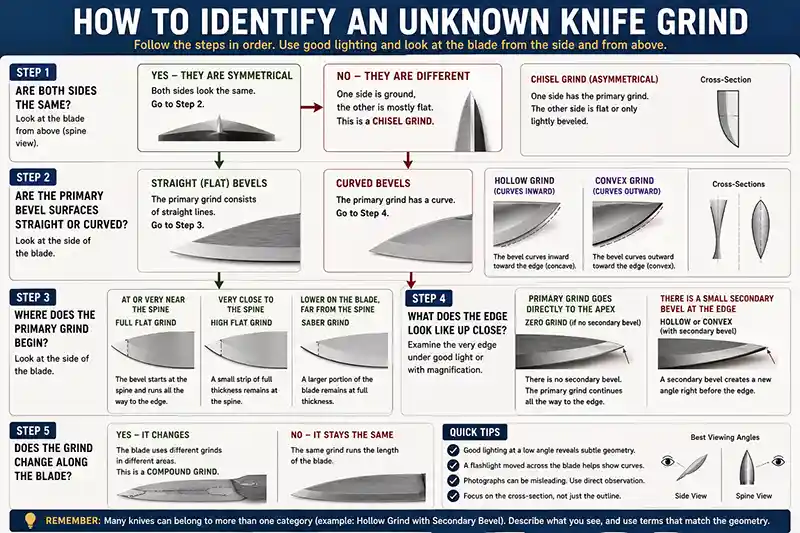
Identifying a knife grind becomes much easier once you stop trying to memorize every profile and instead examine the geometry in a particular order. The most important clues are where the primary grind begins, whether its surfaces are straight or curved, whether both sides of the blade match, and what happens immediately before the cutting edge.
Start by looking at the blade from the side. Find the line where the primary bevel begins. If that transition reaches essentially all the way to the spine, you may be looking at a full flat grind. If a narrow strip of full-thickness blade remains above a large flat bevel, a high flat grind becomes more likely. If a substantial portion of the blade remains at full thickness before the bevel begins, the geometry falls somewhere within the broader saber-grind family.
Next, examine the surface of the primary grind itself. Straight bevels suggest some form of flat geometry. A surface that curves inward toward the edge indicates a hollow grind, while a gradual outward bow points toward convex geometry. These curves can be subtle, so reflections moving across the blade under good lighting may reveal geometry that is difficult to see in a photograph.
Then look at both sides. If they mirror one another, the blade uses the symmetrical construction found on most common grinds. If one side carries the primary bevel while the other remains largely flat, you may be looking at a chisel grind. Remember that the exact bevel on the ground side can still be flat, hollow, or another geometry.
Finally, inspect the cutting edge itself. Does the primary grind continue directly to the apex, or can you see a narrow secondary bevel creating another angle immediately before the edge? If the primary geometry reaches the apex without that separate bevel, the blade may also qualify as zero ground. This is why a knife can sometimes belong to more than one grind category at the same time.
If the geometry appears to change as you move from the heel toward the point, examine different sections separately. A hollow grind near one portion and a flat grind somewhere else indicates a compound design rather than one uniform grind applied to the entire blade.
You do not always need to find one perfect label. Describing what you actually see is often more informative: high flat bevels, a concave primary grind, an asymmetrical cross-section, a convex transition, or no secondary bevel. Grind terminology is useful because it gives those observations names, but understanding the geometry matters more than forcing every knife into a single category.
Which Knife Grind Is Best?
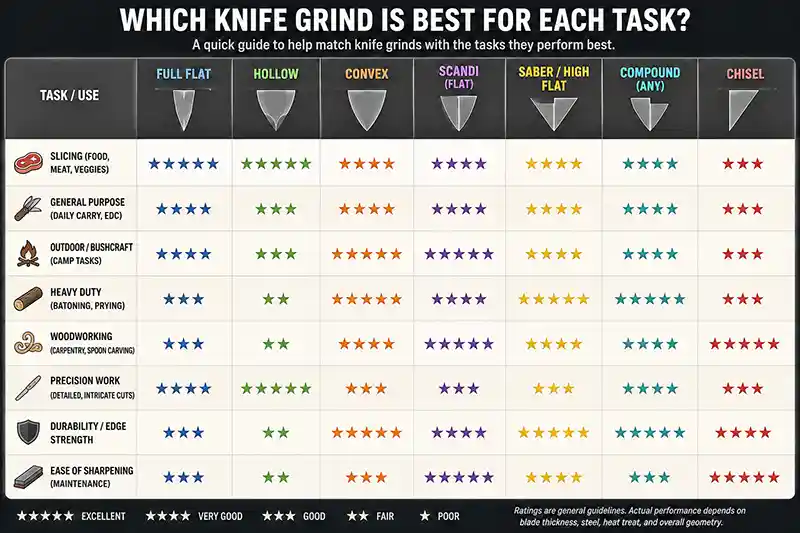
There is no single knife grind that is best in every situation. Each geometry represents a different way of balancing cutting efficiency, material behind the edge, blade thickness, sharpening, manufacturing, and the demands the designer expects the knife to face. Calling one grind universally superior ignores the reason so many different geometries developed in the first place.
For knives where efficient slicing is a major priority, thinner full flat and hollow-ground geometries can make a great deal of sense. When more material behind the edge is desirable, designers may favor saber, convex, or other more substantial geometries. Scandi grinds bring their own combination of a broad sharpening bevel and relatively thick upper blade, while compound grinds allow different portions of the same blade to emphasize different characteristics.
Even those generalizations have limits. A thick full-flat-ground blade can have more substantial geometry than a thin saber-ground blade. A shallow hollow grind may behave differently from a dramatically hollow-ground one. A convex blade can be ground relatively thin or left considerably thicker. The grind name tells you how the blade is shaped, but dimensions determine how strongly that geometry is expressed.
The knife's intended role should therefore come before the grind label. A compact folding knife intended for everyday utility does not necessarily need the same geometry as a larger outdoor fixed blade, just as neither needs to be ground like a kitchen knife designed primarily for slicing food. The best geometry is the one that fits the rest of the knife and the work it was designed to perform.
This is why buying a knife based entirely on one specification can be misleading. Blade steel, thickness, heat treatment, grind, edge geometry, handle design, construction, and intended purpose all interact. Grind matters enormously, but it matters as one part of a complete design rather than as a ranking where one geometry always comes out on top.
The Geometry You Cannot See From the Side
Knife grinds are easy to overlook because most of what defines them exists across the thickness of the blade rather than within its familiar silhouette. Two knives can have nearly identical profiles while hiding completely different geometry behind their cutting edges. One may taper gradually from the spine, another may remain thick until halfway down the blade, and another may curve inward or outward in ways that are difficult to recognize until the blade is viewed from an entirely different angle.
Once you understand those differences, terms such as full flat, saber, hollow, convex, Scandi, chisel, zero, and compound grind become more than names on a specification sheet. They describe decisions about where steel has been removed, where it has been retained, and how the blade transitions from its thickest section toward an edge measured on an entirely different scale.
None of those decisions exists in isolation. Grind geometry works alongside blade thickness, edge bevel, steel, heat treatment, blade shape, and overall dimensions. Change one variable and the characteristics of the finished knife can change with it. That is why two knives made from the same steel with the same blade shape can still feel surprisingly different when they actually begin cutting.
Perhaps the most useful lesson is simply to start looking at knives in three dimensions. The side profile tells you the shape of the blade. The cross-section reveals the grind. Look closer still and you find the edge bevel and, finally, the microscopic apex where the cutting actually begins. Each layer tells a different part of the story.
The next time two similar-looking knives perform differently, the explanation may not be visible from the side at all. It may be hidden in a fraction of an inch of steel between the spine and the cutting edge, where some of the most important decisions in knife design are made.
What Is the Best Knife Grind for Everyday Use?
There is no single knife grind that is best for every everyday task, but full flat and high flat grinds are common choices because they can provide relatively efficient cutting geometry while remaining versatile enough for a wide range of folding and utility knives. Hollow grinds are also frequently found on everyday knives, particularly when designers want relatively thin geometry behind the cutting edge.
The better choice depends on what the knife will actually be used to cut. Opening packages, breaking down cardboard, preparing food, cutting cord, and performing general utility work can place different demands on a blade. Grind is also only one part of the design, so blade thickness, edge geometry, steel, heat treatment, and overall dimensions should be considered alongside the grind type.
What Is the Difference Between a Full Flat Grind and a Saber Grind?
The main difference is where the primary bevel begins. On a full flat grind, the sides of the blade taper from at or very near the spine toward the cutting edge. A saber grind leaves a section of the blade at or near its full thickness before the flat primary bevel begins farther down the blade.
The distinction can become less obvious with a high saber grind because raising the bevel closer to the spine makes its geometry increasingly similar to a full flat grind. The easiest way to tell them apart is to look for a strip of full-thickness steel above the primary bevel. If one remains, the blade is generally some form of saber or high flat grind. If the taper extends essentially all the way to the spine, it is a full flat grind.
What Is the Difference Between a Hollow Grind and a Convex Grind?
A hollow grind curves inward as the blade tapers toward the cutting edge, creating a concave cross-section. A convex grind curves in the opposite direction, bowing outward as it approaches the edge. Looking directly at the cross-section is the easiest way to distinguish the two because their side profiles may reveal very little about the difference.
The opposing curves also distribute material differently. A hollow grind can remove considerable material from the middle of the primary bevel while leaving the blade thicker farther above the edge. A convex grind maintains an outward curve that can retain more material behind the edge. The exact characteristics of either grind still depend on blade thickness, grind depth, edge geometry, steel, and the proportions of the individual knife.
Is a Scandi Grind the Same as a Saber Grind?
A Scandi grind and a saber grind can look similar because both leave a substantial portion of the blade at or near its full thickness before the primary bevel begins. The important difference is usually found near the cutting edge. A traditional Scandi grind uses a relatively low, broad primary bevel that continues directly to the edge, while a conventional saber grind commonly transitions into a separate secondary edge bevel.
The terminology can overlap because a Scandi grind could technically be described as a particular form of low flat grind, and not every modern Scandi-ground knife follows exactly the same geometry. Some include small micro-bevels at the edge, for example. For practical identification, the broad bevel running toward the edge is usually the most recognizable characteristic of a Scandi grind.
What Is the Easiest Knife Grind to Sharpen?
Scandi grinds are often considered relatively straightforward to sharpen because their broad, flat primary bevel can provide a large reference surface for maintaining a consistent angle. Conventional knives with clearly defined secondary edge bevels can also be straightforward to maintain because routine sharpening concentrates on the narrow bevel at the cutting edge rather than the entire primary grind.
Convex and compound geometries can require more attention because their surfaces do not necessarily provide one simple flat angle to follow. Hollow-ground knives are commonly sharpened at a separate secondary bevel, so maintaining the edge itself can still be relatively straightforward. Ultimately, sharpening difficulty depends not only on the grind but also on the steel, edge geometry, sharpening equipment, and how closely the user wants to preserve the blade's original geometry.
Does a Hollow Grind Stay Sharp Longer?
A hollow grind does not automatically stay sharp longer than other knife grinds. Edge retention is influenced heavily by factors such as blade steel, heat treatment, edge angle, apex geometry, what the knife is cutting, and how the knife is used. The primary grind affects the geometry behind the edge, but it does not by itself determine how quickly the apex becomes dull.
What a hollow grind can do is maintain relatively thin geometry behind the cutting edge because of its concave primary bevel. As the knife is sharpened and the edge gradually moves higher into the blade, that geometry can influence how the knife continues to cut even though the edge itself still requires sharpening. This distinction is important: a blade can remain relatively thin behind the edge without the actual cutting edge remaining sharp indefinitely.
What Is the Strongest Knife Grind?
There is no single knife grind that is always the strongest because durability depends on the entire blade geometry rather than the grind name alone. Grinds that retain more material behind the cutting edge, such as many convex and saber grinds, can provide substantial support, but blade thickness, edge angle, steel, heat treatment, and overall dimensions can be equally important.
A thick full-flat-ground blade, for example, may be considerably more robust than a very thin saber-ground blade despite the general characteristics associated with those grinds. Convex geometry is often associated with demanding cutting tools because its outward curve can preserve material behind the edge, but even that does not guarantee greater strength in every design. The amount and distribution of steel matter more than the label applied to the grind.
Can a Knife Have More Than One Grind?
Yes. A knife that uses different grind geometries on different portions of the same blade is generally described as having a compound grind. For example, one section might be hollow ground while another uses flat geometry, allowing the designer to distribute material differently along the length of the blade.
A knife can also fit more than one grind description for a different reason. Terms such as zero grind describe what happens where the primary geometry reaches the cutting edge rather than defining one specific primary-grind shape. A Scandi or convex blade, for example, could also be zero ground if its primary geometry continues directly to the apex without a separate secondary bevel. Grind terminology can therefore overlap rather than placing every knife into one exclusive category.
Does Blade Thickness Matter More Than Blade Grind?
Blade thickness and blade grind describe different parts of the geometry, so neither one can be considered more important in every situation. Thickness tells you how wide the blade stock is at a particular point, while the grind determines how that thickness is distributed as the blade tapers toward the cutting edge. The two characteristics work together.
A relatively thick blade can still become quite thin behind the edge if its height and grind geometry allow a gradual taper. Conversely, a thinner blade can retain surprisingly substantial geometry near the edge if the primary grind begins low on the blade. This is why blade thickness alone cannot reliably predict cutting performance. To understand the cross-section, you need to know both how thick the blade begins and how the grind removes that material on the way toward the edge.
Can Sharpening Change a Knife Grind?
Normal sharpening usually changes the edge bevel rather than the primary grind. On a typical knife with a secondary bevel, sharpening removes a relatively small amount of steel near the cutting edge while leaving the much larger flat, hollow, convex, or saber-ground surfaces essentially unchanged.
Over time, however, sharpening can alter the blade's geometry. Repeatedly sharpening a zero-ground or Scandi blade at a steeper angle can create a secondary bevel that was not originally present. More extensive thinning or reprofiling can remove enough material from the primary bevel to change the grind itself. A knife's geometry is therefore not necessarily permanent, but substantially changing the primary grind requires far more material removal than ordinary edge maintenance.
How Can You Tell What Grind a Knife Has?
The easiest way to identify a knife grind is to examine how the blade changes thickness from the spine toward the cutting edge. Look for where the primary bevel begins and whether its surface is straight, concave, or convex. A bevel extending essentially from the spine suggests a full flat grind, while a section of full-thickness blade above a flat bevel indicates some form of saber or high flat grind.
Lighting can help reveal less obvious geometry. Reflections moving across the primary bevel may expose the inward curve of a hollow grind or the outward curve of a convex grind. Looking toward the blade from the spine or examining its cross-section can make these differences even clearer. You should also check whether both sides are symmetrical and whether a separate secondary bevel appears immediately above the cutting edge.
Does Knife Grind Affect How Easily a Blade Cuts?
Yes. The grind determines much of the geometry behind the cutting edge, which affects how the rest of the blade moves through material after the apex begins the cut. A blade that remains relatively thin behind the edge generally creates less wedging resistance than one that becomes thick very quickly, although the difference becomes more noticeable in some materials and deeper cuts than in others.
Grind is not the only factor involved. Blade thickness, blade height, edge angle, sharpness, surface finish, steel, and the material being cut can all influence cutting performance. This is why two equally sharp knives can feel surprisingly different during the same task. The cutting edge starts the cut, but the geometry behind it helps determine what happens next.
Why Do Knife Makers Use So Many Different Blade Grinds?
Knife makers use different grinds because no single cross-sectional geometry provides every desirable characteristic at once. Making a blade thinner behind the edge can reduce cutting resistance, while retaining additional material can provide more support behind that edge. Grind height, curvature, symmetry, and the presence of a secondary bevel give designers different ways to balance those competing priorities.
The intended purpose of the knife also influences those decisions. A geometry chosen for a thin slicing blade may make little sense on a heavier outdoor knife, while a grind designed around easy maintenance or woodworking may differ from one intended for general utility. Manufacturing methods, sharpening considerations, blade thickness, steel, and even aesthetic preferences can influence the final choice. The variety of knife grinds exists because knife design is ultimately a series of compromises rather than a search for one universally perfect geometry.
What Is the Difference Between a Knife Grind and an Edge Angle?
A knife grind describes the larger cross-sectional geometry of the blade as it transitions from its full thickness toward the cutting edge. Terms such as full flat, hollow, convex, saber, and Scandi describe this larger geometry. The edge angle refers to the much smaller geometry immediately at the cutting edge, usually where a secondary bevel forms the final apex.
This means two knives can have the same primary grind while being sharpened at different edge angles. A pair of full-flat-ground knives, for example, could have noticeably different secondary bevels even though their primary grinds belong to the same category. Grind and edge angle influence one another as parts of the complete blade geometry, but they describe different features.
Can Two Knives With the Same Grind Cut Differently?
Yes. Sharing the same grind type does not mean two knives have identical geometry. Two full-flat-ground blades could differ in blade height, stock thickness, thickness behind the edge, edge angle, and the exact position where their taper begins. Those differences can produce noticeably different cutting characteristics even though both knives are accurately described as full flat ground.
Sharpness, steel, heat treatment, surface finish, and the material being cut can introduce additional differences. Grind names are useful because they describe the basic structure of the blade's cross-section, but they are not complete performance specifications. The dimensions and execution of the grind matter just as much as its name.
What Does Behind the Edge Thickness Mean?
Behind the edge thickness refers to the thickness of the blade measured a short distance above the cutting edge rather than directly at the apex. The apex itself becomes extremely thin, so measuring only the very edge tells us little about how rapidly the rest of the blade thickens. Looking slightly above it provides a better indication of how much material the primary grind leaves near the cutting edge.
This measurement can help explain why two equally sharp knives behave differently during deeper cuts. A blade that remains relatively thin immediately behind the edge generally presents less material that must pass through the cut, while thicker geometry can create more wedging. There is no universally ideal behind-the-edge thickness because the appropriate geometry depends on blade dimensions, materials, construction, and intended use.
Does a Higher Grind Make a Knife Slice Better?
A higher grind can create a more gradual taper toward the cutting edge when other dimensions remain similar. If two blades have the same height, stock thickness, and edge thickness, beginning the primary bevel closer to the spine provides more distance over which the blade can narrow. This can reduce the angle of the primary bevel and potentially decrease resistance during deeper cuts.
That does not mean a higher grind automatically makes every knife a better slicer. Blade thickness, thickness behind the edge, edge angle, grind curvature, surface finish, and overall dimensions still matter. Comparing grind height is most useful when the other characteristics of the blades are reasonably similar.
What Is a Micro-Bevel on a Knife?
A micro-bevel is a very small secondary bevel added at the cutting edge at a slightly steeper angle than the larger geometry behind it. It may be narrow enough to be difficult to see without looking closely, but it changes the geometry immediately surrounding the apex while leaving the primary grind essentially unchanged.
Micro-bevels are particularly relevant when discussing zero and Scandi grinds. A blade whose primary bevel originally runs directly to the edge can develop or intentionally receive a small micro-bevel during sharpening. This adds a separate edge angle without requiring the entire primary bevel to be substantially reworked. As a result, a seemingly tiny change at the edge can alter the final geometry while the rest of the blade continues to have the same primary grind.
You May Also Be Interested In:
- A Visual Guide to Knife Blade Shapes and What They Were Designed For
- The Most Common Pocket Knife Blade Shapes Explained
- What Is a Karambit Knife? Beginner Guide to Karambits
- Assassin Arm Blade and Other New Weapons
- 12 Fixed Blade Knives You Should Know About
- Karambit vs Push Dagger: Which Blade Would You Bet Your Life On?
- From Garden Tool to Combat Blade: The Evolution of the Kunai
- Why Every Day Should Be an EDC Knife Day: How a Simple Knife Can Make Your Life Easier and Safer
- Best EDC Knife: How to Choose the Right Everyday Carry Knife
- Bowie Knife vs Hunting Knife: What's the Difference?
Leave a Reply